


Heat Pump Installation in Terryville, NY
Upgrading to a heat pump is a practical, energy-efficient choice for many Terryville, NY homes. Proper installation determines long-term comfort, efficiency, and equipment life.
Why a heat pump makes sense in Terryville, NY
Terryville experiences humid summers and cold winters moderated by Long Island’s coastal influence. Modern heat pumps provide reliable heating and cooling, often outperforming older boilers or window ACs in year-round efficiency. Coastal salt air and humidity influence equipment selection and outdoor placement, making corrosion resistance and proper drainage essential. For homes in older neighborhoods or those with tight attic and basement spaces, ductless mini splits can be a less-invasive option.
Common installation types and common issues in Terryville homes
- Central split heat pump systems (ducted) for full-house comfort
- Ductless mini split systems for additions, garages, or homes without usable ductwork
- Hybrid systems pairing a heat pump with an existing gas furnace for very cold spellsCommon installation challenges in Terryville include:
- Undersized or poorly sealed ductwork that reduces efficiency
- Limited outdoor pad space or proximity to salty air that accelerates corrosion
- Older electrical panels lacking capacity for new compressor loads
- Complex routing for refrigerant lines in homes with finished basements or tight wall cavities
The installation process: step-by-step
Below is a practical overview of what a homeowner can expect during a professional heat pump installation.
1. Site assessment and load calculation
- Conduct a Manual J load calculation to size the system to your home’s heat loss and gain. This considers insulation, window types, infiltration, and occupancy.
- Inspect existing ductwork, electrical service, and optimal locations for indoor and outdoor units.
- Evaluate site conditions specific to Terryville: exposure to salt air, prevailing winds, and typical snow/ice patterns that could affect outdoor unit siting.
2. Equipment selection
- Choose the right type (air-source, cold-climate, ductless mini split, or hybrid) based on the load calculation and home layout.
- Specify corrosion-resistant finishes or packaged covers for outdoor units in coastal-exposed sites.
- Confirm indoor unit options for airflow, filtration, and noise levels appropriate to bedrooms and living spaces.
- Select compatible controls and thermostat options to maximize efficiency and user comfort.
3. Placement of outdoor and indoor components
- Outdoor units should be placed on a level pad or elevated stand above expected snow level, away from heavy salt spray, and with sufficient clearance for airflow and service access.
- Indoor units (air handler or wall-mounted heads for mini splits) are located to optimize airflow and minimize refrigerant run length while matching home aesthetics.
- Plan refrigerant and condensate routing to avoid structural damage and ensure reliable drainage.
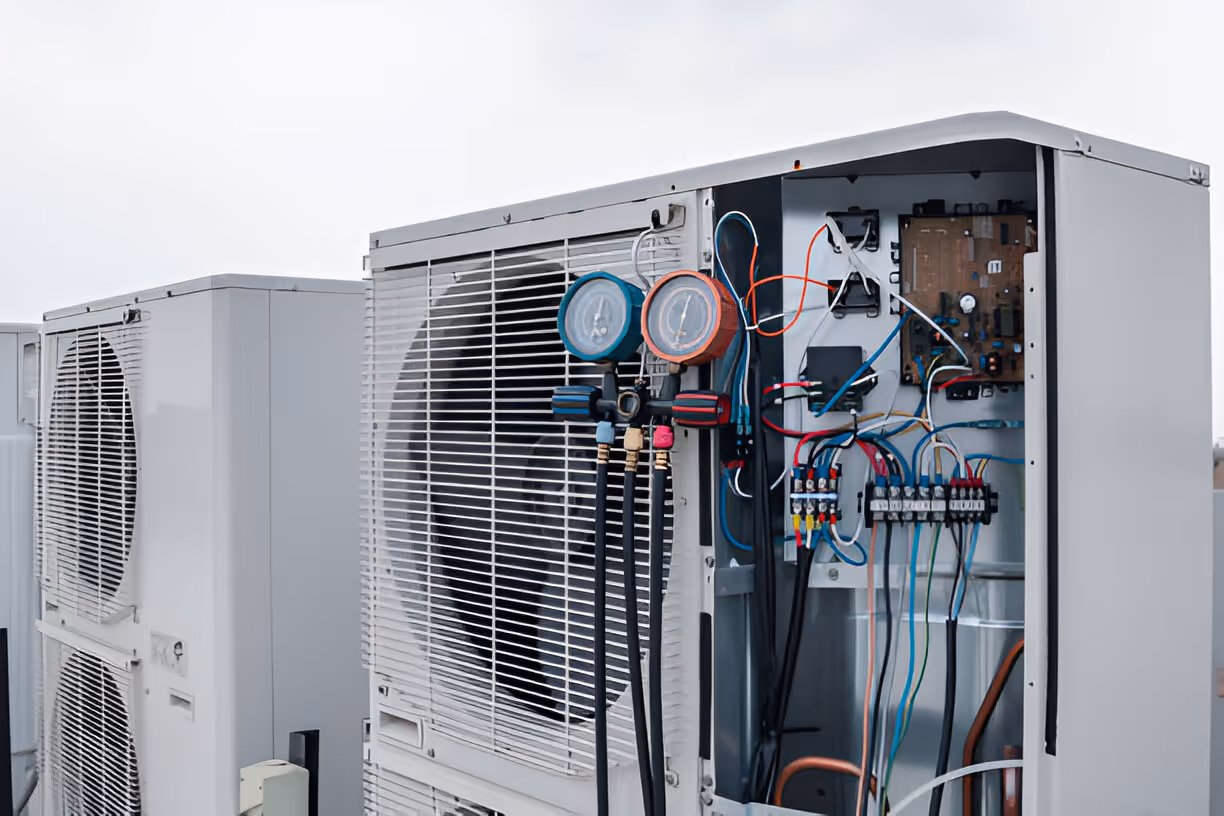
4. Refrigerant line and electrical work
- Install refrigerant lines, insulating them properly and routing to minimize bends and thermal losses. Perform vacuum, leak test, and charge to manufacturer specs.
- Upgrade or add electrical circuits as needed, including appropriately sized breakers, disconnects, and surge protection. Ensure wiring meets local code and manufacturer requirements.
- Coordinate with any needed upgrades to the service panel or subpanel to safely handle the system’s startup current.
5. Permitting and inspection guidance
- Obtain permits required by the Town of Brookhaven and Suffolk County. Permits typically cover refrigeration, electrical, and building code compliance.
- Prepare for municipal inspections at stages such as rough electrical, refrigerant piping, and final system operation. Proper documentation (equipment specs, load calculations) expedites approval.
- Be aware of local code requirements for setbacks, noise limits, and outdoor unit screening in residential neighborhoods.
6. Post-installation testing and commissioning
- Perform a full system checkout: verify refrigerant charge, measure superheat/subcooling, confirm airflow rates, and test electrical loads.
- Test heating and cooling cycles across operating modes and verify defrost operation for cold-weather performance.
- Calibrate controls, zone dampers (if present), and thermostats. Confirm system balance so all rooms reach intended setpoints.
- Provide a homeowner walkthrough explaining system operation, thermostat programming, filter access, and warranty registration.
Typical timelines
- Single-zone ductless mini split: 1 day for standard installations with clear access.
- Standard single-family ducted split: 1 to 3 days for a straight swap where ductwork is adequate.
- Complex installs (panel upgrades, extensive duct modification, multi-zone systems): 3 to 5+ days depending on scope and permit scheduling.Permitting and inspections may add several days to a couple of weeks depending on local backlog.
Homeowner preparation checklist
- Clear access to attic, basement, furnace closet, and planned outdoor unit location.
- Provide safe, unobstructed workspace and notify about pets and security systems.
- Ensure interior access to electrical panel or inform if panel upgrades are expected.
- Remove obstacles from the outdoor pad area; keep a 2 to 3 foot clearance around the intended unit.
- Plan for brief outages during tie-in work; protect sensitive electronics if needed.
After installation: performance, warranty, and maintenance tips
- Verify nameplate data and model numbers for warranty registration and documentation.
- Expect an adjustment period while the system is commissioned and the home reaches thermal balance.
- Regular maintenance preserves efficiency: change filters as recommended, keep outdoor coils clear of debris and salt residue, and schedule annual tune-ups that include refrigerant and electrical checks.
- For coastal conditions, periodic rinsing of the outdoor coil and inspection for corrosion-prone connections will prolong equipment life.
- Monitor for ice build-up on the outdoor unit in winter; the system’s defrost cycle should manage light icing, but persistent ice or poor defrosting indicates service is needed.
Why professional, code-compliant installation matters in Terryville homes
A correctly sized and installed heat pump delivers predictable comfort, lower operating costs, and longer equipment life. In Terryville, local climate factors and building characteristics make accurate load calculation, corrosion protection, and code-compliant electrical work especially important. Proper permitting and professional commissioning ensure safety and system performance while protecting manufacturer warranties.
This guide outlines what to expect and how to prepare for Heat Pump Installation in Terryville, NY so homeowners can make informed decisions and ensure reliable, efficient heating and cooling for years to come.
Customer Testimonials
Hear directly from homeowners who trust Bobby O’s HVAC Inc. for fast response times, honest service, and lasting comfort.

I got 3 estimates for the job but only Bobby O’s knew about rebates etc. the workmanship was outstanding and Armond really knows his stuff and is a true craftsman, something that is in short supply these days.

Competitive pricing. Nice, easy, and clean installation. No problems for a long time. When there was a hiccup, the problem immediately. Highly recommend.
Our AC stopped working in the middle of the heat wave. Called the company and they were able to get a tech out the same day to get us up and running. Great service!!
Quality professional service in a timely manner. Highly experienced in the industry. Great troubleshooting skills
I’ve had a service contract with Bobby O’s for about 6 years. They are always responsive, professional and thorough.
Compressor stopped working as I am on a service plan response was same day
and all was made right
My bedrooms had no AC!
They came and quickly evaluated the problem, replaced the bad part and I soon had complete cool AC everywhere.
Rate was very reasonable!
This was a fabulous experience. Most people don't even return your call. Bobby returned call right away, and at my house the next day!!
Fixed the issue!!! And on top of it gave me a great price!!! I totally recommend him!!!
Bobby is great! He was extremely helpful and accommodating to get my heat back running again at a reasonable price. Highly recommend
I was referred to Bobby O's HVAC through a friend. They came the very next morning, assessed the problem. I chose to replace rather than repair. They were fair, efficient, neat, extremely professional and fast!


